
[ad_1]
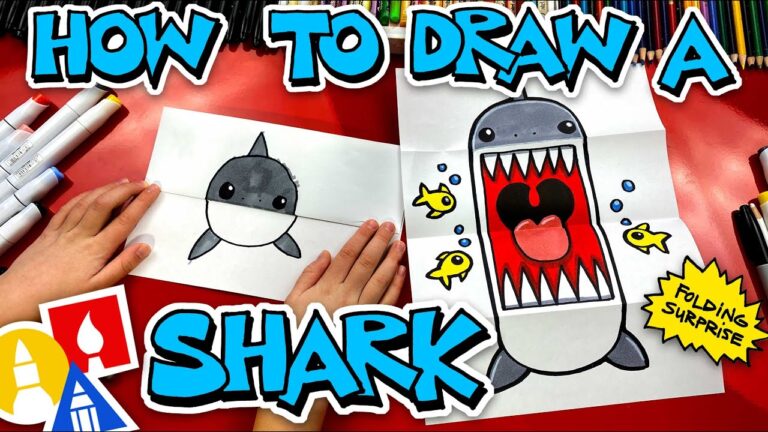
Okay, here’s a detailed guide on how to draw a shark folding surprise puppet, breaking it down step-by-step:
I. Planning and Basic Shapes
-
Decide on the Shark’s Pose: Think about the shark’s action when "opened". Will it be snapping, swimming, or revealing a message? This will impact the initial drawing. For simplicity, let’s assume a snapping shark.
-
Divide the Paper: Fold a sheet of paper in half. This fold line will be important later. The top half of the paper will be for the "closed" or initial drawing, and the bottom half will show the "surprise" when it’s unfolded.
-
Basic Shark Body (Top Half): On the top half of the folded paper, lightly sketch the basic outline of the shark. Use simplified shapes:
- Body: An elongated oval or teardrop shape. Make it relatively short and stout, as this is the "closed" view.
- Head: A slightly pointed oval at the front of the body.
- Tail: A crescent shape extending from the back of the body. It should appear mostly above the horizontal crease to allow space for the unfolded surprise.
- Fins: A dorsal fin (triangular) on top and two pectoral fins (small rounded triangles or trapezoids) on the sides of the body.
- Mouthline: Lightly sketch a curved line to indicate the mouth on the upper portion of the head.
- Guide Marks for the "Surprise": While still on the top half, lightly sketch where you want the opened mouth (with teeth!) to appear on the bottom half of the paper when unfolded. This will act as a guide to help match the top and bottom elements. A wide, curved "U" shape extending downwards from the mouthline will suffice. Keep this light.
II. Drawing the Initial (Closed) Shark – Top Half
-
Refine the Body Shape: Based on your basic sketch, refine the shark’s body. Add a slight curve to the back. Smooth out any sharp angles.
-
Refine the Head: Sharpen the nose slightly. Add a small eye (a dark circle) near the top of the head.
-
Fins: Give the fins more definition. Make the dorsal fin triangular with a slightly curved back edge. Round the pectoral fins. Consider adding a small pelvic fin (a smaller rounded triangle) near the bottom of the body towards the rear.
-
Tail: Refine the tail shape into a crescent or half-moon shape. The top lobe of the tail is usually larger than the bottom.
-
Details:
- Gills: Draw a series of short, curved lines representing gills just behind the head. Usually 5-6 gills.
- Mouth Line: Define the curved mouth line, but do not draw any teeth on the top half.
- Details on Fins: Add subtle lines or curves to suggest the thickness and form of the fins.
- Shading: Add light shading to the top part of the shark’s body to indicate form and roundness.
III. Drawing the "Surprise" (Opened Mouth) – Bottom Half
-
Unfold the Paper: Gently unfold the paper.
-
The Lower Jaw/Mouth Interior: Using your guide marks from step 4 of part I, draw the bottom jaw. It should be a larger curved "U" shape that connects seamlessly with the mouth line on the top half of the paper when the paper is folded. Make sure the bottom jaw creates a wide-open mouth.
-
Teeth: Now draw the teeth. These are the key to the surprise!
- Draw rows of sharp, triangular teeth along the inside of both the upper (top half of the paper) and lower (bottom half of the paper) jaws.
- Make the teeth slightly larger towards the front of the mouth and smaller towards the back.
- Overlapping teeth can create a more menacing look.
-
Inside the Mouth: Add details inside the mouth, such as a tongue (a slightly rounded shape at the bottom), and the back of the throat (a dark, receding area).
- Lower Body (Optional): You can extend the shark’s body downwards from the bottom jaw, completing the full body shape, or leave it as just the open mouth. This depends on your desired look. If you extend the body, be sure to mirror the general curvature and width from the top half’s body.
IV. Finalizing the Drawing
-
Outline: Carefully outline the entire drawing (both top and bottom halves) with a darker pen or pencil. This will make the image stand out.
-
Erase Guidelines: Erase all the light sketch lines and guidelines.
-
Shading and Details:
- Add more detailed shading to the shark’s body and inside the mouth.
- Consider adding highlights to the teeth to make them appear sharper.
- Add texture to the skin with small dots or cross-hatching.
- Darken the inside of the mouth to create depth.
-
Color (Optional): Color the shark with markers, colored pencils, or paint. Sharks are typically grey, blue-grey, or brown. The belly is usually lighter (white or light grey). Consider making the inside of the mouth pink or red.
- Fold and Test: Fold the paper back along the original crease. Ensure the shark looks good in its "closed" state and that the "surprise" is effective when opened. Adjust any lines or details as needed.
V. Advanced Techniques (Optional)
-
Perspective: Try drawing the shark from a different angle (e.g., a three-quarter view) to make it more dynamic.
-
Different Shark Species: Research different shark species (Great White, Hammerhead, Whale Shark, etc.) and incorporate their unique features into your drawing.
-
Action/Environment: Add bubbles, fish, or other elements to create a more interesting scene. Consider drawing the shark swimming towards something.
- Message: Incorporate a message inside the shark’s mouth when it opens, adding to the "surprise" element.
That is how you would draw a shark folding surprise puppet. Remember to start with light sketches and gradually add detail.
[ad_2]