
[ad_1]
Here’s a detailed guide on how to draw anime mouths and teeth, covering a variety of styles and expressions:
I. Basic Anime Mouth Styles
-
Simple Line: This is the most basic and often used for neutral or slightly amused expressions.
- Draw a simple curved line. The curve can be shallow or more pronounced depending on the desired expression. A shallower curve suggests a more serious or neutral expression, while a deeper curve suggests a smile or light amusement.
- Add a very slight indication of the lower lip. This can be a subtle shading below the line or a barely visible second line. Sometimes, this is omitted altogether for the simplest look.
-
Slightly Open Mouth: Used for slight surprise, anticipation, or emphasis while speaking.
- Draw a curved line for the upper lip, similar to the simple line but slightly more open.
- Draw a second, shorter curved line beneath the first, representing the lower lip. The space between the lines indicates how open the mouth is. A wider gap represents a more open mouth.
- Add a small, dark shape inside the opening to represent the darkness of the mouth cavity. This shape is often a rounded rectangle or an oval. The shape should be darker than the shading of the lips.
-
Smiling Mouth: Used for various degrees of happiness.
- Draw a wider, upward-curving line for the upper lip. The degree of the curve determines the intensity of the smile. A gentler curve indicates a small, polite smile, while a more pronounced curve shows a wider, more genuine smile.
- Draw a similar curve beneath it for the lower lip. Again, the distance between the lines indicates the openness of the mouth and the intensity of the smile.
- Add small cheek lines at the corners of the mouth. These are short, curved lines that extend outwards from the corners of the mouth, indicating the muscle movement of smiling.
-
Open Mouth (Laughter, Shock, Yelling): For more extreme expressions.
- Draw a larger, more open shape for the mouth. The shape can be oval, rounded rectangle, or even a more irregular shape to suggest extreme emotion.
- Indicate the teeth (covered in detail below).
- Show the tongue (optional, but adds to the expression). The tongue is typically a rounded shape inside the mouth, often overlapping the lower teeth.
- Darken the inner mouth cavity significantly.
-
Pouting Mouth: Used to show sadness, annoyance, or flirtatiousness.
- Draw a short, downward-curving line for the mouth. This represents the pressed-together lips.
- Draw a larger, more rounded shape below the line to represent the lower lip being pushed outwards.
- Consider adding small cheek lines that curve downwards to enhance the expression of sadness or annoyance.
-
Sad Mouth: Used to show sadness or disappointment.
- Draw a line curved slightly downwards.
- Add subtle shading around the corners of the mouth to accentuate the downward curve.
- Consider very slight lines curving down from the corners of the mouth, mimicking the nasolabial folds that deepen when sad.
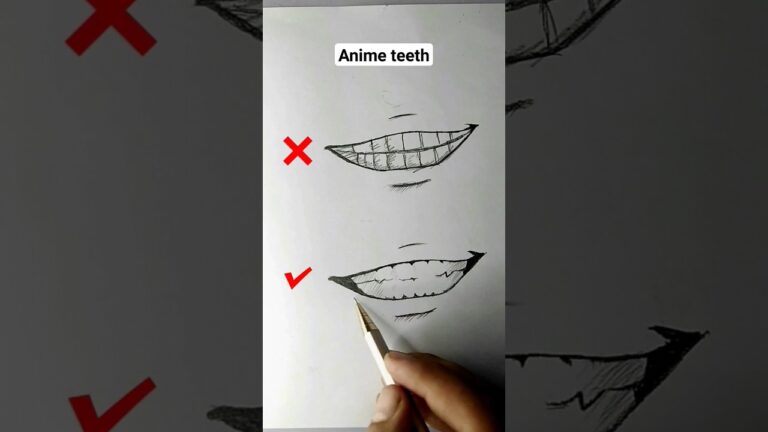
II. Drawing Teeth in Anime Style
-
Simplified Teeth: The most common approach is to simplify the teeth.
- For a closed mouth smile, you may only show a suggestion of the upper teeth with a few small, rectangular shapes.
- These rectangles are often grouped together and shaded to indicate the individual teeth without drawing them precisely.
- The bottom teeth are usually not visible in a closed mouth smile.
-
Showing Individual Teeth (Open Mouth):
- Draw a row of rectangular shapes for the upper teeth. Anime often simplifies the teeth into uniform rectangles rather than realistic tooth shapes.
- The central incisors are typically larger and more prominent than the lateral incisors.
- The canines can be slightly pointed, but they are often still represented as slightly longer rectangles.
- The molars and premolars are usually simplified into smaller rectangles that are less detailed.
- Draw a similar row of teeth for the lower jaw, making them slightly smaller than the upper teeth.
- Slightly overlap the upper and lower teeth, especially when the mouth is slightly closed.
-
Exaggerated Teeth (For emphasis, comedy, or character design):
- Sharp Teeth/Fangs: Some anime characters have sharp, pointed teeth, often canines. These are more triangular in shape.
- Overbite/Underbite: Exaggerate the position of the upper or lower teeth to create unique character traits.
- Number of Teeth: Sometimes the number of teeth is reduced or increased for stylistic effect.
-
Teeth Shading and Detail:
- Use light shading on the teeth to give them form. Typically, the tops of the teeth are lighter, and the shading increases towards the gum line.
- Indicate the gaps between the teeth with thin, dark lines.
- Consider adding a subtle highlight to the teeth to make them appear shiny. This is a small, bright white spot on one or two of the teeth.
- Draw the gum line above the teeth. The gum line is usually a slightly darker shade than the teeth themselves.
III. Tips for Drawing Anime Mouths and Teeth:
- Practice Different Angles: Try drawing the mouth from different perspectives (front view, side view, 3/4 view).
- Reference: Use real-life references of mouths and teeth to understand their anatomy and shape, even if you are simplifying them. Look at photos of people smiling, laughing, and making other expressions.
- Simplify Shapes: Break down the mouth into basic shapes (lines, curves, ovals, rectangles) before adding details.
- Experiment with Styles: Don’t be afraid to experiment with different styles and find what works best for you.
- Consider the Character’s Personality: The style of the mouth should match the character’s personality. A cute character might have a small, rounded mouth, while a more aggressive character might have a larger mouth with sharper teeth.
- Mouth and Expression Connection: Practice drawing the mouth in conjunction with the eyes and eyebrows. The combination of these features creates the overall expression. For example, a smiling mouth paired with squinted eyes conveys genuine happiness.
- Use Layers (Digital Art): If you are drawing digitally, use layers to separate the different elements of the mouth (lips, teeth, tongue) so you can easily edit them.
IV. Step-by-Step Examples
-
Simple Smile:
- Draw a curved line for the upper lip.
- Draw a similar curve for the lower lip, slightly below the first.
- Add small cheek lines at the corners of the mouth.
- Add a few small rectangles for the upper teeth.
- Shade the lips lightly.
-
Open Mouth with Teeth:
- Draw an oval shape for the open mouth.
- Draw a row of rectangular shapes for the upper teeth.
- Draw a row of rectangular shapes for the lower teeth.
- Draw the tongue as a rounded shape.
- Darken the inside of the mouth.
- Shade the teeth and add highlights.
-
Pouting Mouth:
- Draw a short, downward-curving line for the pressed lips.
- Draw a larger, rounded shape below the line for the lower lip.
- Add small cheek lines that curve downwards.
- Add subtle shading to emphasize the pout.
[ad_2]