
[ad_1]
Okay, here’s a breakdown of how to potentially make a DIY stove in 5 minutes in extreme conditions, focusing on speed and readily available resources:
Core Principle: The goal is to create a contained, elevated platform for a small fire that efficiently directs heat upwards for cooking or boiling.
Methods, Materials, and Considerations (Depending on Availability):
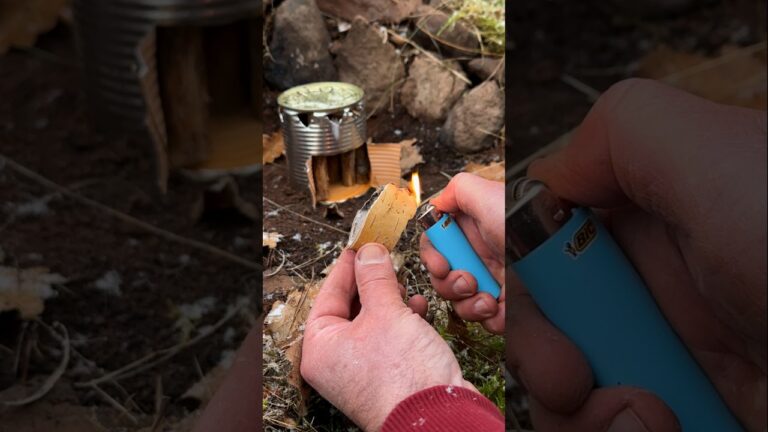
1. Can Stove (Classic and Versatile):
- Materials: Two metal cans (soda, soup, or similar), a knife or sharp object, possibly some tinder.
- Steps:
- Inner Can Prep: Use the knife to carefully remove the top of one can. This will be the inner can.
- Outer Can Prep: Carefully cut the top completely off another can. This is the outer can and will surround the inner can to provide structure.
- Crimping/Slitting (Important for Draft): Around the top of the outer can, use the knife to create several vertical slits or small crimps. These allow air to be drawn in from the bottom, feeding the fire. It is critical to ensure that a slit/crimp is at the top and at the bottom of the outer can.
- Assembly: Carefully nest the prepared inner can inside the prepared outer can, leaving a gap at the top (crimped/slit) to allow for airflow and combustion. The inner can should be lower than the outer can. This gap is vital.
- Fueling: Place tinder (dry grass, twigs, cotton balls with petroleum jelly, etc.) inside the inner can. Light the tinder.
- Cooking: Once the fire is established, place a pot or container on top of the can stove.
- Extreme Conditions Considerations:
- Finding Cans: Scavenging might be necessary. Abandoned campsites or debris fields are possibilities.
- Sharp Object: A knife or sharp rock fragment is crucial. Use extreme caution to avoid injury.
- Fuel: Finding dry tinder in wet or snowy conditions can be difficult. Prioritize collecting dry materials before starting. Check under logs, inside tree cavities, or use your own clothing (as a last resort, sacrificing a small piece of fabric can save your life).
- Wind: Shield the stove from wind using rocks, snow blocks, or any available windbreak.
- Elevate from Ground: If the ground is wet or frozen, place the stove on a flat rock or piece of wood to prevent heat loss.
2. Rock Stove (Rudimentary but Reliable):
- Materials: Three or more rocks (preferably flat on at least one side), tinder.
- Steps:
- Arrangement: Arrange the rocks in a circle or triangle, leaving a space between them. The rocks should be close enough to support a pot or container but with openings to allow airflow.
- Fueling: Build a small fire in the center of the rock enclosure.
- Cooking: Place the pot on top of the rocks, spanning the gaps.
- Extreme Conditions Considerations:
- Finding Rocks: Rocks are usually readily available unless in a completely snow-covered environment.
- Stability: Ensure the rocks are stable and won’t collapse under the weight of the pot.
- Wind: Construct a windbreak around the rock stove using larger rocks, snow, or other materials.
- Heat Loss: Insulate the base of the stove with dry material (leaves, pine needles) to minimize heat loss to the ground.
- Smoke: Rock stoves can produce a lot of smoke; ensure adequate ventilation if using it in a confined space (which is generally not recommended).
3. Upside-Down Fire/Swedish Torch (More Fuel Intensive, Longer Burn):
- Materials: A log or large piece of wood, a knife or axe (highly desirable), tinder.
- Steps:
- Prepare the Log: Create several deep cuts (almost to the bottom) in the top of the log, creating a "starburst" pattern. You can use an axe to split the log partially if you have one.
- Ignition: Place tinder inside the cracks in the top of the log and ignite it.
- Cooking: Once the top of the log is burning well, you can place a pot directly on top of the burning surface.
- Extreme Conditions Considerations:
- Finding a Log: Requires a forested area. The log should be relatively dry.
- Tool Dependency: This method is much easier and faster with an axe or saw. A knife can be used, but it will take significantly longer and is more dangerous.
- Smoke: This method produces a lot of smoke initially.
- Burn Time: This stove burns for a long time, which can be an advantage in extreme cold, but it also uses a lot of fuel.
- Pot Placement: Can be unstable to place a pot on top of the burning log.
4. Mud Stove (Suitable if Mud is Available):
- Materials: Mud, sticks/twigs, tinder.
- Steps:
- Construction: Mold the mud into a horseshoe shape, creating walls.
- Strengthening: Embed sticks or twigs within the mud walls for added support and structural integrity.
- Fueling: Create a fire pit within the horseshoe and light the fire.
- Cooking: Place a pot on top of the mud walls, spanning the gap.
- Extreme Conditions Considerations:
- Mud Availability: Dependent on location and climate. Frozen mud is useless; it needs to be malleable.
- Drying Time: The mud stove will be fragile until it dries and hardens, which can take time depending on weather. It may crack with heat.
- Stability: Ensure the mud walls are thick enough to support the pot.
- Insulation: Mud provides good insulation, helping to retain heat.
Key Survival Priorities Related to Stove Building:
- Shelter: Before building a stove, ensure you have adequate shelter from the elements.
- Water: Finding and purifying water is paramount. The stove is needed to boil the water to make it safe to drink.
- Hypothermia Prevention: Staying warm is critical. Building a fire, even a small one in a stove, can make a significant difference.
- Resourcefulness: Improvise with whatever materials are available. Adapt the techniques based on your surroundings.
- Safety: Prioritize safety to avoid injuries. Use knives carefully and be aware of the risk of burns.
Important Considerations for Extreme Conditions:
- Fuel Conservation: In extreme conditions, fuel is a precious resource. Build a small, efficient fire.
- Smoke Inhalation: Avoid inhaling smoke, especially in enclosed spaces. Carbon monoxide poisoning is a serious risk.
- Wind Protection: Wind can quickly extinguish a fire and dissipate heat. A windbreak is essential.
- Snow and Ice: Melting snow and ice requires a significant amount of energy. If possible, find a source of liquid water.
- Dehydration: Drink plenty of water, even if you don’t feel thirsty. Cold weather can dehydrate you quickly.
- Prioritize: Build the stove only after securing shelter and a water source. The stove assists with water purification and food preparation, but it’s not the top priority for immediate survival.
[ad_2]